Wednesday, August 25, 2010

VMFAmazing


As part of our summer program, we were asked to go to the VMFA and do a few sketches. I had not been there since the remodel and addition, and let me tell you, It's AWESOME! I'm so proud to have such a great and well done museum as a part of Richmond. Rumor has it, it's one of the top in the country...
They even focused on the outdoors as well. Here is a picture of some of the landscaping and walkways that lead you to the building. There is a manmade pond and bridge over top and a cascading waterfall.


Inside the new section, it feel very airy and open because of all the natural light that is let into the space. Also, there is alot of glass used (even on the elevator!) and curvy walls (very hard to do).


The shadows that are created are really beautiful and of course, change throughout the day depending in where the sun is in the sky. These are some support beams that are at the very top of the three-story atrium, under a skylight.

Just thought I'd throw in some of the pieces that jumped out at me during my visit there. I plan on going back soon because it's really too big to enjoy all of it in one day. I also became a member (only $10 for students!) which allows me to get into all the exhibits for free and go to member-only events. Everybody should join!


Some of the cascading gardens and waterfalls I talked about earlier:


Honey, I'm Homestead!


I thought I would use this break in school to do a few posts outside of the academic realm. This past weekend I was able to visit the Homestead in Hot Springs, VA. Even though I missed the historic tour (my activity of choice!), I was able to read up a little about the Inn and marvel at its beautifully kept interior and exterior.


The Homestead was originally created in 1766 and was founded because of the hot springs that are located on the property, which were said to have medicinal properties (today, you can pay $17 to enjoy one of the pools.) Around the campus certain springs are protected and capped off with grates, so that onlookers can't touch...

The Homestead has had many a famous client from the likes of Thomas Jefferson and James Madison (Go DUKES!) to Bush and Clinton and many of the Presidents in between. And who can blame them? With the addition of some beautiful dining rooms, this place caters to the power players!

And while you are there, make sure to take part in the all-you-can-eat buffet breakfast!


One of the best parts about this Inn is the gorgeous columns and grande entrance the front of the Hotel allows. The columns soar and there is a huge veranda out front where people relax on rows of rocking chairs and chaise lounges.

In conclusion, one night is not enough at the beautiful estate. If you've got the dough, splurge on a two-night stay and bring some extra cash to soak in the Mineral Springs and dine like a king...or should I say President!

Monday, August 23, 2010

Final Project!

The last day of the summer workshop finally came and went. Let me just tell you that I got a little taste of what it's like to "live in the studio" as all your artist friends like to say. It may sound fun, and at times, it can be, but for the most part, everyone has their iPods tucked in their ears and are working dubiously. Long hours or work, all building up to our final project- to design a balcony in the Pollack building at VCU inspired by a concept taken from our original "well designed object" that we brought in on the first day of class. Check out my other blog posts for more information! So, without further ado....my final project...


This first picture is my critique board including a watercolor I did, a couple of small concept models, words I was working with (adaptation was my concept), and some drafting- plan, longitudinal elevation, and transverse elevation.


Here are the drafts close up. This one is a transverse- that means if I were to stand in the room and look at one side of the balcony, this is what it would look like. Darker lines indicate things that are closer to you. The hatch marks indicate things that have been "sliced through."


This one is the longitudinal elevation, meaning if you were to stand in the courtyard (aka you would be floating two stories off the ground) in order to look into my balcony. The two tall, hatched line are columns. You can see the stairs on the left and a space for personal introspection (required in our program) to the right. Also, the transverse elevation would be looking at the left side of this.


This is what is called the plan- meaning if I were to look straight down on the space, this is how it is drawn. The space of introspection is to your right and the hallway is at the top of the picture and the courtyard is at the bottom.


So, if you aren't an architect, it may be difficult for you to envision the space as a real space. So, I've also included some pictures of my to-scale model made out of chipboard and museum board. I will walk you through the space. Before I do, here were some of the guidelines:
There must be 3 spaces-
Transition 80 square ft
Group Discussion 145 square feet
Introspection Space 60 square feet
The Group space must be visually separate from the hallway, and the introspective space must be acoustically and visually able to be cut off from the group space. The transition space must be able to access the introspective space and group space and balcony edge.

So, as you walk down the hallway inside the building, you would see this...


As you move past the wall and turn the corner into the space, you'll notice that the second wall is displaced into the space and the ledge from the hallway (the hallway is 4 inches taller than the balcony) has been extended into the space (that the white on the floor..)


Moving into the space you would be able to turn right and you would see this- a staircase leading to a platform and a seating height with table. Running along the balcony's edge, you will find a bar height ledge to lean on and talk to people in the group space. Above (on the ceiling) you will notice a dropped ceiling- more on that below.)


As you stand in the group space, your eye travels along the dropped ceiling to the introspective space.
Here's a ceiling shot for ya...


There is a door that slides in and out of the wall (pocket door) that can shut off the introspective space, but also gives some openings above eye level, so the space is not a completely shut off box.

Here is the final space looking down (just like the plan draft above)!
And looking in from the courtyard...(just like the longitudinal elevation above!)


All of this is why I haven't been able to post for a week- sorry for the delay. I have been sitting at my little table staring at pieces of cardboard for hours. But, I'm very proud of the space I've created and I'm really looking forward to my materials class so I can become a little more educated on how to choose what these spaces would really be made out of in real life!
Please post comments so I can get some feedback and know someone is reading my blog! haha


Thursday, August 12, 2010

POWER TOOLS ROCK

Our final project for school is to create a place for daydreaming that incorporates our concept (mine is adaptation) on this balcony in our building. It's about 26' long and almost 11' wide. Here are some before pictures of the balcony:


The ceiling adds some dimension to the space because of the inset spaces that are created.


We were given the task of creating a to-scale model of the balcony, including the corridor behind the balcony. If you know me, you will know that I was very excited that we got to use some power tools! I gotta give credit to my two classmates that were in my group- we banged this baby out in a matter of only a few hours!


Here is the balcony without a roof:


Looking down on the space (plan):


The ceiling we created to fit over the balcony:


With the ceiling on as if you were looking down the corridor:


With the ceiling on and elevated:


Hope you like it! I will be posting pics of my designs as soon as I like them....which could be a while. But, I'll be sure to keep you entertained in the meantime!

Monday, August 9, 2010

Side Note

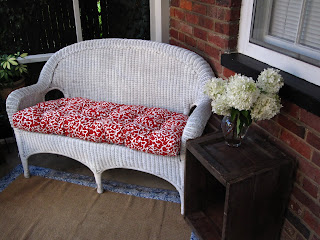
So, I've been in model land for a little while, just making more and more chipboard and Strathmore iterations of my ever-evolving concept of adaptation. I've made some great headway as far as feedback and the critiques go, but I thought I'd lighten up the blog with a little side project I've been working on...my screened-in porch! Also, I thought I'd throw in some fun artwork from First-Fridays...


I found this wicker bench at an Estate Sale for $40! I found the cushion at Pier One for a whopping $52....BUT I had a giftcard for $50, so it was a steal. Also, I got that AWESOME crate that is serving as a side table which has some great written stamping on the side and says Richmond, VA. I might try and find out how old it is based on the Company name that accompanies it.

On to some fun art! Just some Band Art Posters for your enjoyment....
(Credit given to First Fridays Artwork and all the artists who made these!)

Tuesday, August 3, 2010

From Concept to Real Life


So, this is my concept board. After all my sketching, thinking, painting, rethinking, haiku-ing, thinking (you get the picture), I had to come up with a concept. I searched long and hard and came up with the concept "cradle to cradle." Having to do with the cycle and a never-ending process, I was pumped and thought it would be a challenge. Luckily, my professors and classmates set me straight. They told me to look further to a concept that's not so literal. I suppose coming up with a life cycle concept from an avocado is pretty literal.

So, I had ALOT of work on my hands. Somehow I had to get to a place away from the avocado and come up with a concept from my process. After going back to my watercolors, I found the variation within the layers to be very intriguing. What determines how that pigment disperses? Where one splotch starts, a line could form, a ridge-type saturation or something else could take shape. This variation got me thinking about how painting is a little like Biology in that way. The paint acts as the ever-changing organism, dependent upon its circumstance and environment.

So, with that I'm marinating on a concept somewhere in between adaptation and deviation from a common point and how "speciation" may also influence the surroundings.

The next step was to make a 3-D model of our concept. How do you do that? Well I chose to use a piece of chip-board as an "obstacle" that causes a seemingly stagnant piece of paper to deviate into to parts. One part starts to fold on itself, becoming a kind of incomplete cube, while the other half remains the way it began. This represents a part of my concept, but I have more models to make and concepts to explore....I suppose.

So, enough blabbing. Here is the model:


After making it 3-D we had to take that 3-D image and learn a little about drafting in order to make it 2-D on a to-scale piece of paper. So, we headed back to the drawing boards....I mean, DRAFTING tables....whoops!


And, so I began the process of turning my piece into two types of drawings: a plan (kind of like a horizontal cross-section of the object) and an elevation (like looking at the object from one of its sides.)
The first is the plane. I've aligned the model next to the drawing so you can try to see what I was drawing. We use weight of line and thickness to denote something closer or farther away, or a permanent sturdy fixture.


The second is the elevation:


Anyway, that's the update! Until next time!